How to configure automatic synchronization of your mail.com default
Organizer with Mozilla Thunderbird
Info:
Calendar functionality was integrated into Thunderbird with version 78.0. If
you don't see any options to add or view a calendar, please make sure to update
Thunderbird to the latest version.
-
Click on the menu icon in the top right corner of the
Thunderbird window.
-
In the New submenu, select
Calendar.
-
Select the On the Network option and then
Next to continue.
-
In the User name field, enter your mail.com address.
-
In the Location field, enter the path https://caldav.mail.com/begenda/dav/your mail.com email
address/calendar.
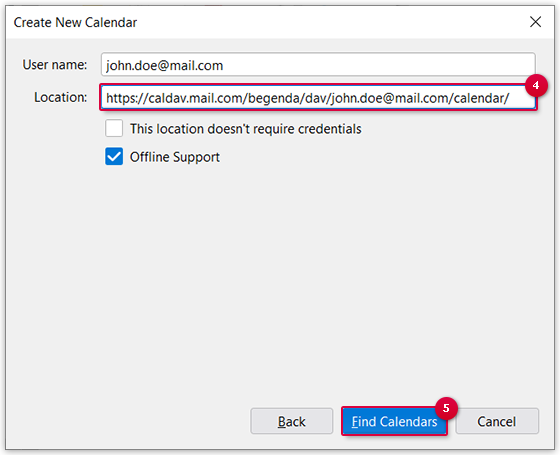
Example: For the email address john.doe@mail.com, you enter https://caldav.mail.com/begenda/dav/john.doe@mail.com/calendar/ as the
location.
-
Click Find Calendars.
-
Enter the password for your mail.com
Account and click on Sign in.
-
Under Calendar Type choose CalDAV.
-
Under Properties give the mail.com
Organizer a name and, if applicable, a color. Appointments
from this calendar will later be displayed in the color. Click
Subscribe.
Your mail.com "My Calendar"
default calendar is now synchronized with Mozilla Thunderbird.
How to configure automatic synchronization of other mail.com
Organizers with Mozilla Thunderbird
-
Start Mozilla Firefox and enter the path https://caldav.mail.com/your mail.com email address in the address
line. Press Enter.
-
Enter your mail.com email address and password.
-
Click Home collection at the end of the page.
-
Right-click the name of the calendar you want to synchronize with
Thunderbird.
A context menu opens.
-
Select Copy Link Location in the context menu.
-
Start Mozilla Thunderbird.
-
Click on the menu icon in the top right corner of the
Thunderbird window.
-
In the New submenu, select
Calendar.
-
Select the On the Network option and then
Next to continue.
-
Select the CalDAV format.
-
Click the Location field and press
Ctrl + V to paste the link
address of the calendar from the clipboard.
-
Click Next.
-
Give the mail.com
Organizer a name and, if applicable, a color. Appointments
from this calendar will later be displayed in the color. Select
Next to continue.
-
Complete setup by clicking Finish.
Next step:
If you want to synchronize other mail.com
Organizers with Thunderbird, repeat steps 4 through 14.